Welcome to my own little spot of blog space. Thank you for stopping by. I hope you will check back often to see what kind of craftiness I have going on in the world of scrapbooking, card making and general crafting.
Showing posts with label Cricut. Show all posts

Wednesday, May 16, 2012

A card for Brandon!

This week Cooking with Cricut's design team has been busy creating cards for Brandon, an adorable young boy who was badly injured in a car accident.   Brandon will be the recipient of cards that come in for Madison's I Feel the Love Project for May 2012.  For more details about Brandon or the I Feel the Love Project visit Madison's blog here.


Inching by to Say Hi!


I think the Stickles added some needed character to the caterpillar. 
I am borrowing this cartridge and since I can't find it in stores anymore I have been stalking eBay listings.


Recipe
Cricut Cartridge - Stretch Your Imagination (Card, Card Frame Features @ 5")
Stickles - Xmas Red, Yellow, Orange Peel, Green, Star Dust and Firefly
Cardstock and Stickers - No information available
Black Glaze Pen


Head on over to Cooking with Cricut and link up your card!  I'd love to see what you create for Brandon! 


Thanks for stopping by!

Wednesday, September 21, 2011

Personalized Christmas Album

I can not believe that it is almost October!  It seems that this year has gone by very quickly. 

Here's a little glimpse of what you can do with a pre-made album (this one was purchased at Hallmark), a Cricut and a little vinyl.  The recipient (in this case -- his parents) are sure to love this one of kind gift.  

Cricut Cartridge: Alphalicious 

Thanks for stopping by!

Thursday, September 15, 2011

Personalized Name Baby Book -

There is nothing sweeter than a baby's smile and laughter!  

To celebrate Zephyr's birth, I created a name book for his grandmother using my Cricut and Design Studio. Have I mentioned how much I love my Cricut?!?!?  I love making these books as gifts.   I can guarantee this is one-of-a-kind!! 

Zephyr's Full Book


Eucalyptus Stickles was used to accent the patterned paper. 
The embossed "Baby" was cut from a Hallmark Card.


 Crystal Stickles was used to accent the letter E.


 The "P" was embossed using the Cuttlebug Swiss Dots embossing folder 
and Crystal Stickles were used to accent the dots.


 The duck was created using the New Arrival cartridge 
and accented with Yellow and Orange Peel Stickles.


  The "H" and frame were accented with Turquoise Stickles.


 Paw and his two boys!


The "Y" was embossed using the Cuttlebug Traffic Jam embossing folder 
and Crystal Stickles were used to accent the outline.  
The giraffe is SEI Sparklers.


The journal tag is from the Making Memories Animal Crackers spiral journaling book.


The "R" was embossed using the Cuttlebug Swiss Dots embossing folder 
and Eucalyptus Stickles were used to accent the dots and frames.  
The rocking horse ribbon is from Michael's.


  The stick pin is SEI.  


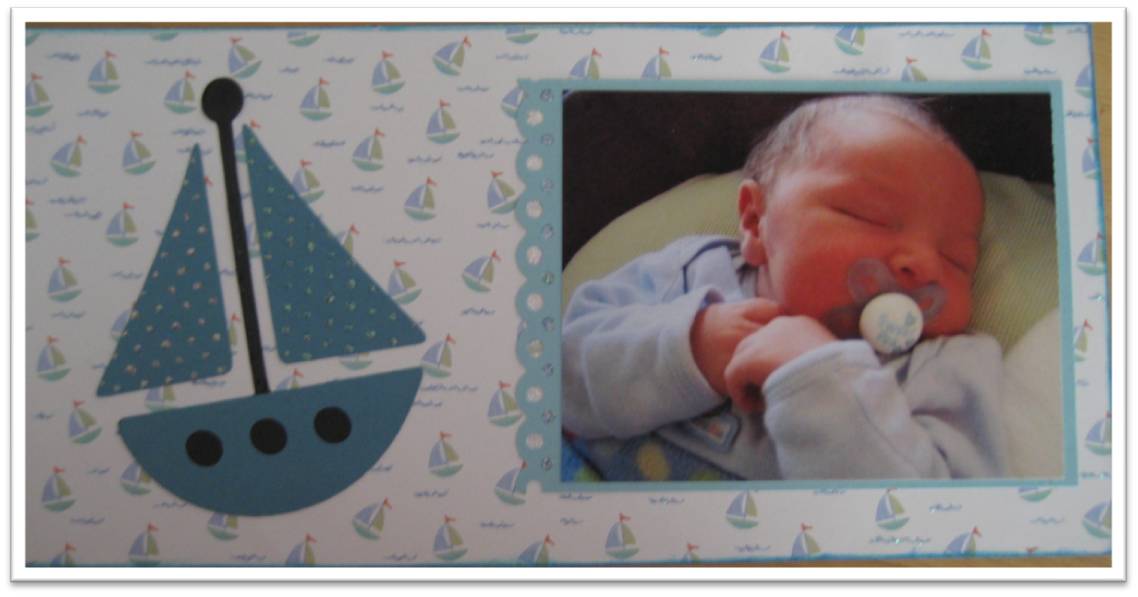
  The boat was created using the New Arrival cartridge, embossed with the Cuttlebug Swiss Dots embossing folder and accented with Crystal Stickles.
 The waves were also accented with Waterfall Stickles.
The photo mat was created by the Martha Stewart Edger - Scallop Dot. 


All about the little details. These are the charms that hang from the book rings. Pastel color eyelets were also used to reinforce the holes for the book rings. 

Name books are a labor of love, but well worth it!  

Thanks for stopping by! 
Friday, August 19, 2011

Cricut Die Cut and "Toss" Swap Item Organization

I enjoy participating in Club CK's Monthly "Toss" Swaps.  Each month our hostess picks a theme and you "Toss" scrapbook related goodies matching that theme to other players.   It is always neat to see how others interpret the theme.  I was keeping all of my tosses together in a page protector like this.... 

It served it's purpose of keeping all of the "like" things together but my problem was the old saying "Out of Sight. Out of Mind." and I wasn't using my goodies -- so I had to come up with another way to store them.  I decided to re-purpose my son's old Pokeman card album and card holders to display my die cuts, journaling blocks and stickers.  

I continued to use page protectors for the larger items. 
I hope this will help me use up my stash of awesome scrapbooking goodies. 

Hope you have a great day!


Monday, August 15, 2011

Coffee Filter Card

Here's a card I created for the Club CK Summer Camp 2011 - Use Coffee Filters on a Project or Layout challenge.   


I used Natural Brew Coffee Filters. 


Cut a strip from the top of the filter, misted with water and crinkled it.  After I straighten it out I used the heat gun to dry it. 

 After it was dried I used Tim Holtz Walnut Stain Distress Ink.


Other items used were: 
Wausau Paper (scrap pack)
Natural  color card stock
Cricut Cartridge - Graphically Speaking (cut at 2 1/2")
Favorite Findings - Blue and Brown Buttons
Offray brown ribbon
Raffia


Hope you have a delicious day, thanks for stopping by!


Thursday, August 4, 2011

Sunday, July 10, 2011

Personalize w/ Cricut!

With a name as unique as mine, I have always known that if I received a gift with my name on it the gift giver had to 1.) make it by hand or 2.) have it made for me.  I have always felt special when receiving something with my name on it! 

I personalized this scrapbook organizer using my Cricut and vinyl.....now it's easy to put kits in it and quickly grab it on my way to crop with friends.  (BTW - speaking of cropping with friends - we will be at Archiver's on July 30th.)


Being able to personalize items is one reason I LOVE my Cricut! Cartridges used: Alphalicious and George and Basic Shapes. Scrapbook organizer/tote purchased at Michael's.